how do you replace the headlight bulbs?
what do I have to do to get the bulb out, like remove the finder? Or is there an easier way?
Never done it before but I found this info in a Honda Accord users forum. "After much research, and little info on "how-to", I replaced both stock 9006 low-beam bulbs on my 2004 Accord. Despite much info on removing fenderwell splash shields, I was able to open the hood, and reach the passenger side harness, remove plug, twist and remove bulb and reinstall- no problem. Driver's side required removing the battery, but same procedure. No problems, no cuts or bruises. Owners manual is unclear, Hayes 2003-05 Honda Accord repair manual is wrong, and the dealer charges $29.95 per bulb installed. Took me 10 minutes. Tried to save the radio settings with a 9V battery in the power plug (memory-saver) but that didn't work." Good luck.
Good post... I just did this myself on the passenger-side low beam bulb and DID NOT go through the wheel well. Steps I took: - Get a right-angle ratcheting screwdriver so you can loosen the three screws securing the bulb in place. Search Amazon for "Lisle 64250" and you'll see what I bought, it's around $15. - With the help of the ratcheting screwdriver to just do an initial loosening of the screw, carefully unscrew (by hand) and remove the screw closest to you, and the screw at the top of the "screw pyramid"... the screw closest to the hood. For the third (the one on the other side of the bulb from you) just loosen it a couple of turns. No need to remove it as that would be the hardest to put back in place later. Just loosen enough so the bulb can be turned and removed from the housing. Be careful not to drop screws into the well as they will be hard to find. - You'll need two hands in there, but unplug the old light from the power harness. Do this by squeezing the harness near the wire end... this will lift the plastic tab that holds the bulb in the harness and allow you to unplug it. - Put new bulb in the housing. Once it is in, with the same hand you should be able to hold the bulb in place while you tighten the screw you left in there. That should hold the bulb in place fairly well to get the other two screws in place. As others suggested I didn't touch the bulb but also didn't run into a point where I felt I had to. I handled it from the plastic end. - Once the holding screws are in, plug in the power harness to the new bulb. It should click right into place. You're done. The whole process took just a few minutes... you'll want to do it with plenty of light available. When I first looked this over it was at night in my garage and it looked harder than it was. In the daylight with no weird shadows it was a no-brainer, and going in through the well wasn't necessary at all (unless maybe if you fumble-finger one of the screws and have to find it. Telescoping magnet would hopefully help in recovering).
u dnt have remove the bumper at all, just have to twist around an piece that holds the bulb in, its kinda hard if the lights have not been replaced at all
The low beams are the far outside bulbs. To change them loosen the 2 screws you can get at and turn the the socket. The drivers side you will have to take out the battery The high beams - you must remove all three screws. SUCKS!!
I just replaced my driver's-side bulb. Pretty much the same instructions I gave last November, except I took the battery out. I took out the screw closest to me but just loosened the top one, I didn't touch the one I couldn't see and was able to turn the bulb housing to remove the bulb. I probably could have just loosened the first one as well, maybe I'll try that next time. I used the same ratcheting screwdriver as I did the last time. I removed the circular piece of the screwdriver and just used that, as it works well that way with the close quarters you are working in. The hardest part of the whole job was getting my hand positioned in such a way that I could get the clip off the end of the bulb before removing it. And I had no need to touch bulb glass as with last time.
If you remove the plug from the bulb first, you do not need to loosen the screws.
I just replaced the passenger side low beam and I only had to get one screw loose less than 15 minutes for the whole thing!!! 2004 Accord. thanks everyone for the great info!!!
Thanks this was very helpful! I thought I could replace the headlight when looking at it, but I was not sure. I read your post, "Thank GOD", and had it replaced in 5 min.
WARNING: If you have a Navigation system and do not have power going to the car when you disconnect your battery your Audio and Navigation system will stop working. You will need to re-enter your Audo and Navi codes into the car to get them to operate again. If you've lost them then goto the link below. As for changing the headlight the instructions above were perfect. That took me only 5 minutes. Getting my codes took me 2 hours because I lost little plastic business card with the codes. I've given instructions with pictures on how to get the codes. Link is below. http://leanforeveryone.typepad.com/lean_for_everyone/2010/04/how-to-retrieve-your-audio-and-navigation-system-codes-2004-honda-accord-with-navigation-system.html
I concur with those who say to do it from the top -- from inside the engine compartment. I did the passenger side low beam bulb after trying to get in from the wheel well as described by the OM. I could not get the wheel well liner to release enough to get access to the bulb -- even after removing the two fasteners. Going in from top is easier. You just have to loosen the screws slightly. 1/4 to 1/2 turn did it for me. Once I got it started, I could turn it with my fingers. You just have to loosen the screws enough to allow the bulb housing to rotate so it can be freed. Then you pull it out with the siring harness attached and you can release the dead bulb from the housing using a flat screwdriver to hold back the locking clip. Pop in the new bulb, and rotate the housing back in its socket until is sort locks back in place. The tighten the screws that you barely loosened. Do not remove the screws and do not drop your screwdriver. I used a stubby 3" Phillips screwdriver and it worked just fine. The operation did require patience and some degree of manual dexterity.
you don't have to unscrew anything. The 9006 bulb is designed to easily twist off. It helps though, if you have small hands to reach in and get a good grip.
For a 2005 passenger side you simply reach into the engine area where the bulb is located, squeeze the plastic clip attaching the wires to the bulb and detach the wires from the bulb. then changing the bulb is easy as can be just twist it 1/4 turn and pull it out. to install the new one just put it in and twist it back into position. then clip the wires back on. There is no need to open the wheel well. there is also no reason to loosen the three screws holding the plate down. those hold the assembly in place and have nothing to do with changing the bulb.
i have an 07 accord with the drivers bulb out. can i really just take the battery our and reach the bulb? my book said to remove the entire fender splash shield
I have an 08' accord and it was easier for me to just undo two screws on the weel well splash guard. I had easy access to changing both the drivers and passangers side bulbs that way. No taking the battery out or anything. Less than 5 min to do both.
i use the wheel well trick alot! pass. side u dont have to do sometimes but mostly always on the driver cause the battery is in the way.
I have a 2007 accord. I had the most difficult time changing the drivers side low wan bulb. I did not remove the battery. I turned the wheel in, as said in the manual. I just removed two plugs and a screw holding the fender splash guard. I loosened two of the screws holding the bulb down with a 2 1/2 " Phillips. The bulb was out easily. Thank you all for the tip on loosening the screws.
Your steps are right on target.
what is the correct part number for the low beam replacement bulb? I found a GE Part # 9006 for $4 on RockAuto.com. Is this the right bulb? I want to make sure both of my headlights have the same appearance at nite. (I dont want one brighter or duller than the other...if you know what I mean)
check the fuses first, on the 2005 at least, there are 4 fuses, one for each bulb. the passenger low beam went out, the bulb looked good, I replaced it with 2 more, no light, Then I checked fuses, they were all good. So I have no light & a mystery. real mechanic time.
just came in from replacing the passenger side low beam headlight bulb. Just wanted to say that it took no more than 8-10 minutes. And you do need a stubby 2.5-3" phillips head screw driver to loosen the three screws that hold bulb 9006 in place. There is no other way around this. I didnt bother coming in from the wheel well either. Just dropped in from above and with a little patience it's a total breeze. Not sure how Matt was able to remove the bulb without loosening the screws though. trust me this was a piece of cake. The driver's side looks a little more complicated and that may require entering from wheel well. Luckily, I dont need to deal with that bulb at this time!!
Neil's post was right on the money. This was for a 2005 Honda Accord lowbeam bulb replacement. Thanks Neil.
You do NOT need to loosen any screws to remove the bulbs. The bulbs are designed to twist out with an 1/8 turn or so. The trick is that you MUST remove the plug first. The system is designed such that installing the plug locks the bulb in position so that it cannot turn and fall out in use. This is a neat feature that very few people have noticed. I just replaced the driver side low beam from the engine bay. I did remove the battery to make access easier. No screw drivers required.
Just replaced my accord 2007 passenger side low beam in less than 60 seconds. Do not remove the screws!! Remove the wiring harness from the back of the bulb and then turn. It comes right out! EASY
Hi Everyone, I just wanted to thank everybody who responded to the original question. I needed to replace the low beam bulbs on my 2004 Accord, and I found this site and this particular discussion through a Google search. I'm not a "car guy" by any means, but reading all of your responses to this question convinced me that I could do it myself without too much trouble. Thanks!! Just to add my experience: Passenger side was easy, just unclipped the wire harness and the bulb came out with a slight turn, no tools required, as others have said. Actually changing the bulb on the driver's side was the same, but the process was complicated by having to remove the battery to do it. Someone with smaller hands or more flexible wrists than I have might be able to do it without removing the battery, but I needed to. Anyway, thanks again! :)
Jradk saved me!! I was able to change my bulb today without removing screws. Of course this was the passenger side. The driver side is way harder. I am a divorced women who is trying to be independent and this made my day :) If I can do it, well anyone can.
I must have small hands. After reading this thread, I first replaced the passenger side by unplugging the harness connector, then removing the old bulb by turning about 1/8 turn. Reverse to reinstall new bulb. After seeing how the passenger side went, I was able to do the same thing on the driver side (mostly by feel) without removing the battery or the wheel-well shield, or using a screwdriver! Thank you, all
Sorry, this was on a 2006 Accord Sedan
Get someone with a small hand and long fingers to reach in there and you may have to twist a collar or press on the metal tad holding it in and don"t just pull
It might be free. I was reading this post. I called the nearest Honda dealer to query the price of the low beam headlight bulbs for my high mileage 2004 Accord EX. "$13.65, and we install them immediately for free." Your mileage may vary.
Driver's side 2003 Honda Accord. Trying to replace the driver's side low beam but the new bulb doesn't click into the wire socket. It slides into the socket but the tab on the bulb doesn't click into the sockett harness so it's not locking in. Nothing appears to be broken on the socket. Any ideas? thanks.
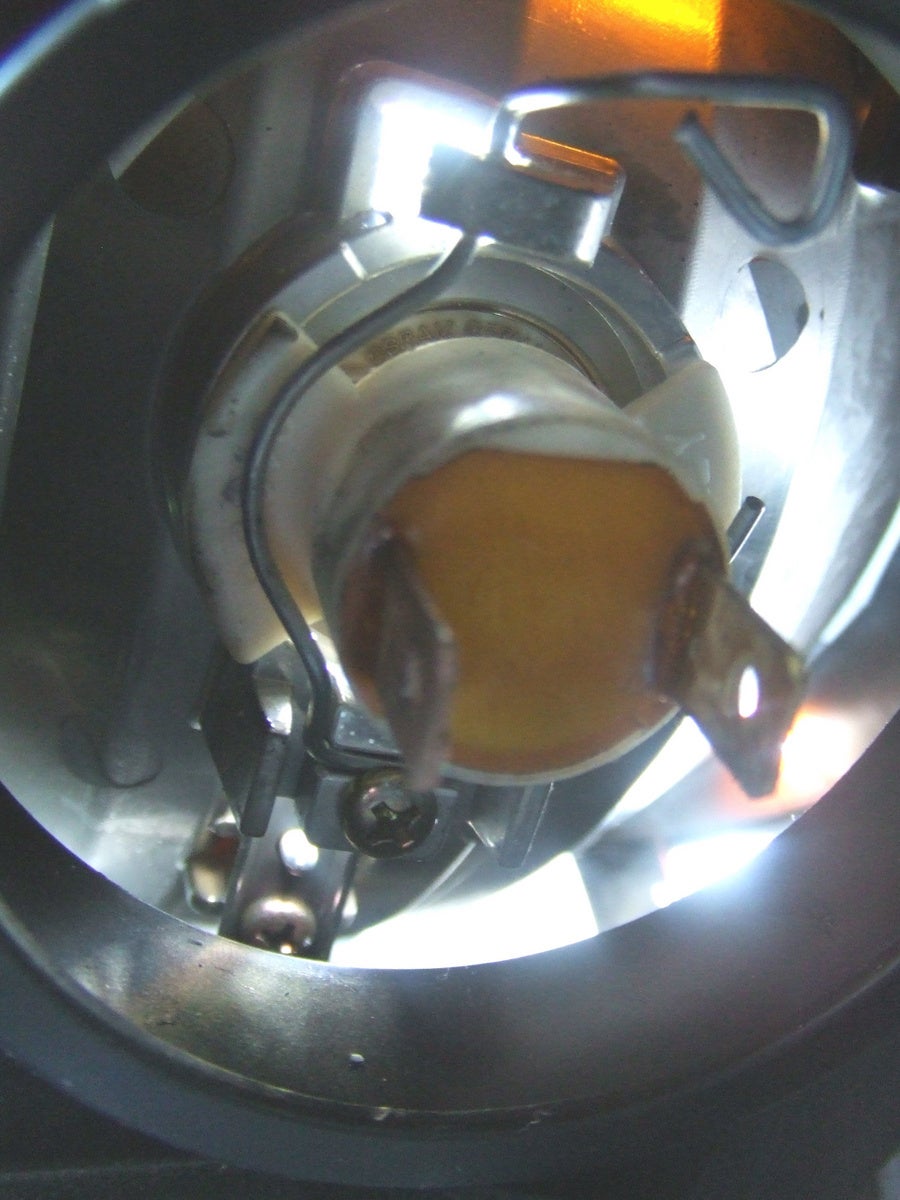
All the forums tell you how to do it but this picture will show you the clip that holds the bulb on. That's the part that's hard to imagine since you can't see down there. Put a small screwdriver in the hole at the top of the clip and pull left towards the center of the engine. It takes a little muscle. After it slides out from the metal tab the clip falls toward the back of the engine but you don't have to worry about losing it since it is held on with a screw.
I just changed the driver side low beam here is my experience: I first tried going in from the wheel well -- bad idea. I'm 5' 9", have somewhat thin wrists, etc -- there is no way to really reach in there the way you need to, to even disconnect the existing bulb. I would never try this again -- but if you're tempted to anyway, here's a link that has some pictures: http://www.paulstravelpictures.com/Honda-Accord-Headlight-Bulbs-Replacement-Guide/index.html The pictures are of the newer model (2008), but it's similar. Perhaps they made more space so that you can do it this way on the newer models. So, I gave up on the wheel well and I took the battery out. I could reach it -- not the easiest, but doable. I found that I did have to loosen the screws (just a little bit) to twist and release the bulb from its holder -- I tried without loosening them, but it wouldn't budge. Aside from a right angled philips of some sort for the bulb holder screws, all I needed was a 10mm socket. I also think I know the person that designed this -- the moron son of the idiot that designed the Chevrolet Monza so that you had to pull the engine to change the spark plugs (in the 70s). This has really changeed my opinion about Honda -- I remember when Hondas, Toyotas, Datsuns, etc were specifically engineered to make them easy to perform routine maintenance. Apparently Honda doesn't care any more, and I will keep that in mind the next time I go car shopping.
I have changed low beam bulbs on 2003 and 2004 Accords. As I stated in an above post, you do NOT need to loosen the 3 screws. All you need to do is remove the wiring harness from the back of the bulb BEFORE you twist the bulb out. The wiring plug acts as a lock when it is inserted in the bulb. If the bulb is plugged in, it will not turn. I would like to have someone that insists that the screws need to be loosened try removing the plug first; they may be pleasantly surprised when the bulb twists out. Just because loosening the screws lets you change the bulb does not mean that it is the right way to do it.
First thanks all for the useful information, which makes my work possible. :) In short, I was able to replace the headlight bulbs for both the driver's and passenger's side without unscrewing anything. I started with the passenger's side. To unplug the white wire housing, I pressed/held the locking tab then pulled down the housing. You may need to try couple of times. Then I rotated the end of the light bulb 1/8 turn towards my left or towards the side of the car, then pulled the light bulb out. To install the light bulb, I did the reverse. For the driver's side, it was a little hard for me. First I wasn't able to find the white wire housing. I had to bend and really looked inside. At the end, I found it. I reached it couple of times but could barely apply any force to unplug. I was about to give up and was ready to uninstall the battery. Fortunately I tried one more time and unplugged the housing. Then things were easy. Thank you all again!
Thanks for the tips to replace the bulb. I had a hard time twisting the bulb(counter clockwise) and I found that if you just loosen the screws slightly the bulb can then easily twist out.
i have tried several times to remove the old bulb fixture from the wheelwell (just as the manual says) but to no avail. The manual states "simply turn the fixture counterclockwise one quarter turn and remove". This is not possible. To anybody reading this Honda, obviously wants you to take it to the dealer and pay top dollar to have the bulb replaced. Dont waist your time trying to do it yourself because you will only cut and bruise your hand before you realize that there are screws that need to be removed before this can be possible. It is not a mistake that this information is not in the manual as obviously Honda would prefer you bring your car in for "service" to replace a headlight bulb for 50 bucks.
conn439, with all respect, did you read any of the other posts above that tell you how to remove the bulbs? Yes, removing the bulb from the wheel-well is problematic, but as many people have stated above, it is quite easy to remove the bulb from under the hood. You are encouraging people to not bother trying this themselves just because YOU couldn't do it. I can change the passenger side bulb in a few minutes with no tools and the driver side with no tools other than those needed to remove the battery. I learned this amazing skill by carefully reading the posts above. If you are so mad at Honda and their dealers why are you telling people to give in and spend the money to have bulbs changed?
It all works!! Working on replacing the headlamps on a 2003 Accord. You can just look at the high beam on the passenger side to see the 3 screws that you simply have to loosen, maybe 2 full rotations to be able to rotate the light housing then pull out. This is easy to see and will help the headlight replacement because it is exactly the same unit and because it is further out to the side of the car it is a bit of a blind reach. The screws are flat/flush types so you'll have to reach and feel with your fingers to know where to insert the Phillips head screwdriver to loosen the screws that hold down the flanges of the light housing. I used a small stubby Phillips head screwdriver, maybe 1 inch in length, no special tool is necessarily needed.
I just replaced the passenger side low beam bulb after struggling for a while, as the high beam was very easy (just turn and pull out) I came to my computer to research and I found this page, read a few posts and went out and only unscrewed the first screw, not all the way, then I turned the socket outwards and it came out easily. I didn’t even touch the other screws. Thank you all for the info and getting me started the right way.

I found your info helpful, however my question is: what is the actual cost of the low beam headlight? I'm a girl so already guys at the car repair places are trying to screw me and I know all I need is the low beam bc my high beams work, however the guy is trying to blowup the price by telling me, "there's a bunch of bulbs within" blah blah when I know just one needs replaced. The turning sygnal, etc. even works. Should I just go to an auto body car parts place?

you are correct, all you need is the low beam bulb, nothing else. if they are trying to sell more than that turn the other way. unfortunately there are plenty of mechanics that suck and try to get as much money as they can from one visit instead of doing an honest job and get people to keep coming, those are the ignorant, not very intelligent “mechanics” that also suck at what they “do”
Earl, did you ever figure out your mystery ? I'm having the same issue.
I replaced both low beam lamps in my daughter's 2006 Accord yesterday. The passenger's side was easy; just press the clip on the plastic wiring connector to disconnect it and then twist the lamp 1/8 turn CCW to remove it. On the driver's side, I tried removing the air filter housing and air inlet duct but couldn't get enough force to twist the lamp. Then I tried taking the wheel well splash guard loose by removing the 2 body fasteners. I could reach through the narrow opening, but still couldn't get enough of a grip to remove the lamp. Finally, I took the battery out and that allowed me to get a good enough grip to remove the lamp. So, removing the battery was the key. If the lamp didn't require as much force to remove it, I probably could have gotten it out after removing the air filter housing or the wheel well splash guard.
Well I read everyone's replys here and not wanting to lose my wife's radio settings I opted to go the route of changing the bulb through the fender. Per other's instructions I removed the one phillips screw and the two pop plug things from the fender splash guard and voila, I could roll it back and gain access to the headlight. Sort of. There's a cross member / brace thing right in the way and while I could wiggle my hand in there (took some effort), that was about the extent of it. With a LED headlamp on my head and a spotlight behind me, with the hood open and light from above I still could barely see anything. I could eventually get my hand on the back of the bulb socket but I couldn't turn it to free it intially. Following others instructions I took a stubby phillips screwdriver and loosed the 2 screws securing the bulb and then I could free the bulb. Then came the issue of actually disconnecting the bulb from the housing. Maybe those who did it this way with zero problems have small hands or something but I just didn't have the room to allow my hands the dexterity to accomplish this. In the end I said forget it. I put everything back and then opted to go the remove the battery route. Battery was out in about 3 minutes and the bulb was accessible and changed in about another 2minutes. Then I realized those 2 screws were still loose from my fender route and had an "OOOps" moment. Having done it once already, I quickly took the fender off again, resecured those 2 screws and re-assembled. I put the battery back and done. I'll let my wife re-enter her stereo code and put her radio presets back. For me it was an hour and 15minutes start to finish. About an hour messing with the fender only to give up. 15 minutes to go the battery route which included gaining re-access to the fender to re-tighten those 2 screws on the bulb housing. I know which way I'll do it next time should I need to replace it again and that's via removing the battery. Hope this helps.
Not sure about the 10 minutes, but the steps are correct. Actual time is longer than advertised.
This was great to read all these posts! I have a 2004 Honda Accord LX. As soon as I got home from work and let the engine cool down, I opened the hood, reached over to the passenger side low beam lamp, turned it CCW 1/8 of a turn and voila - it came right out! I even did it with the wiring harness on and did not mess with the screws. I took the old bulb out, used the proper grease on the contacts and around the gasket of the new bulb, and popped it into place. Without hesitation, I removed the battery (thanks to the posts, I wrote down all my radio settings first) removed the drivers side lamp using the exact same actions as the passengers side, and the job was completed! Taking the battery out also gave me a chance to clean up the battery and terminals. Thanks for all the helpful posts, I would have spent $30 - $35 to have the headlamps replaced at an auto repair store like the last time if it were not for these posts! I did use the Honda owners manual the first time I tried to change the bulbs years ago, and thought I would not be able to play my guitar for weeks. I love my Honda, but they do need to work on being a little more customer friendly with things like this.
I have a 2003 Honda accord. I've read the threads. I am having a really hard time removing the wiring harness. I'm pretty sure I am pressing on the clip and pulling down. The plug/wiring harness does not move at all. What am I missing? Please help. Thanks!
I have always owned Ford trucks and was worried that this would be much more difficult than just reaching into the engine bay. It was, but not by much. For the low beam lamps, follow the directions in the manual. DO NOT REMOVE THE BATTERY. On the driver side, there are two screw clips along the edge of the fenderwell just above and forward of the tire. Use a thin-bladed flathead screwdriver in the little flat spots to first pull the screw plug out about 1/8th inch. Then, pull the clip all the way out. Do this for both clips. Push inward on the fender skirt to get it away from the metal of the fender and then it will pull away from the edge of the fender. It should have plenty of flexibility to allow most people to get their hands and forearms into the area behind the headlight housing. I have big hands and huge forearms and it was no problem at all. Remove the harness from the bulb by squeezing and wiggling the base of the white plastic clip. It should come right off. Give the headlight a small counter-clockwise twist and it should come right out. Leave the screws alone. They are set to just the right amount of tension to hold the lamp in place but to allow it to come out fairly easily. Installation is the reverse of removal, as they say! On the passenger side, raise the hood, remove the harness clip from the lamp, give it a 1/8th inch twist counter clockwise and pull it free. The passenger side is super EASY! I hope this helps! Thanks for the info, guys!
No need to unscrew the bulb folders. Just twist the holder about quarter turn counter clockwise and it should come off. It may be little tight but it will come off. The screws in there looks confusing and I also initially thought you have to get hte screw off but, when I have a bit stronger twist as mentioned in manual, the bulb holder came off.
Don't listen to any of these guys. Kidding.. but really.. I followed the instructions in the owner's manual (going through the wheel well). It was VERY easy and the rubber wheel well went right back in place. No problems. Maybe 10 mins on the 1st one (to get the hang of it). The 2nd one took no more than 5 mins. GOOD LUCK!
2006 Accord, Driver's side low beam replacement: 10 min job. 10 mm ratchet to remove battery Flashlight to see bulb/wiring harness. Push tab on wiring connector and wiggle it off of bulb. rotate bulb counter-clockwise (towards engine) and lift out. Replace with new bulb and reverse the procedure. Most onerous task is remembering how to reset the radio and find the code :-)
read almost all the posts and here is what I found for my 2007 accord hybrid low beam replacement; never touched a screw on the headlights themselves replaced passenger side in about 2 minutes decided to try the NON battery removal proceedure first on driver side removed 2 retaining snaps and one screw in wheel well plastic of wheel well was very flexible and had no trouble moving out of my way I have very large hands and had no trouble removing or replacing bulb replaceing did take a little poking around as visibility was poor thats it! total time maybe 30 minutes for both but that included greasing the O rings and connectors of new bulbs. Thanks to all who wrote here earlier, made things a snap. cheers!
I had a bit more of a challenge, but still managed: I've done the low beam on both sides of my 2003 Honda Accord EX V6. The passenger side is easily accessible from the top. Press hard on the bottom of the white clip and keep gently tugging. It will release eventually. Then turn the old light 1/4 turn counter clockwise, and remove it. Insert new bulb at the same angle you removed the old one, 1/4 turn clockwise and it snaps in place. Replace the wire until the clip snaps and you are done. Nothing else needs to be removed, no screws, nothing. On the driver's side, you will need to remove the battery and any holding case. This guy is accessible, but only barely. Smaller fingers help; I also used some WD. But the actions are the same: Push in the bottom of the white clip on the wire, tug firmly until is pops off. Then the same instructions for removal and replacement of the bulb. I was careful to wipe all surfaces I could reach to make sure nothing with oil or silicon would touch the new bulb's surface. Everything on this side was hampered due to the small area; reconnecting the wire was the biggest of the challenges. But don't remove the screws in the lamp assembly and forget removing any other parts of the front.
Just found this forum this morning. Replaced both low beam bulbs w/Sylvania 9006's. Piece of cake; I didn't need to go through the wheel well, or loosen any screws. Unplug bulbs, turn, and pull out. Put new ones in. You will need to take out the battery; this is hardest part. Whole job took about 15 min. My Honda dealer wanted $14.00 per bulb. Then wanted $17.00 per bulb to install. Went to Auto Zone and bought twin pack for less than $20.00. Really, this is a piece of cake.
I just replaced both low beam bulbs. Start on driver side to get practice - reach in and remove wiring harness plug first. There is a latch that you need to press before you pull off the plug. Once plug is removed the give bulb a 1/4 turn and remove it. You must remove plug first or bulb will not turn. Then just reverse order to install the new bulb. On the driver side, it is possible to snake your arm around the battery and change the bulb. It is tough to unlatch the plug and pull it down with so little room, but I did it. Now that I have it down, I can change the bulbs in less than 10 minutes without losing my radio presets.
Thanks to all posters. I got my low beams changed on my 2003 Accord, and it was generally the same experience as most of the previous. -Couldn't go in form the wheel well as it was too cold to be outside, and my garage is too small to allow work from the side. -Having a 90 degree screw-driver would have been great, but I "made" one by using vice-grips and a small Phillips head "bit" for a drill, clamped at 90 degrees. -passenger bulb came out with no screw adjustments needed. Easy. -Drivers side needed battery removal, although I did get the clip off without removing the battery, (and I am 6'3" and have big hands), but the bulb would not turn without loosening the single screw in the engine side of the triangle. Took 90 minutes, but that's including a trip to the store to get a 10mm wrench :/
First off, thanks all for the extra info that is not described in the manual. Ok, for my 2004 accord sedan I changed the passenger side from inside the hood in 60 seconds. No tools, just pushed the center of the plug and pulled down to remove, turned the old bulb out, turned the new one in and snapped the plug back on. Great info. For the drivers side, I couldn't get my hands to work around the battery and didn't have the tools to take off the battery (did this at work during lunch), so I did the wheel well way and it was easier then I thought. I turned the wheel to the right and then removed only the 2 front pins with a flat head screwdriver. No need for tools after this point. I then pulled out the well cover as far as I could and reached in to the light and pull the plug down, etc. etc. total time was around 10 minutes. Thanks all!
Took the advice of a few and popped the battery, changed the drivers side bulb and had it back together in about 10 min. Thanks!
I just replaced the drivers side low-beam headlight bulb in our 2005 accord today and had a similar experience to many other posters. At first I followed the owners manual and tried to access the bulb via the wheel. I had some trouble getting the clips out that hold on the fender lining - in fact I managed to break one. Secondly, like many others here I found the lining too stiff to move out of the way sufficiently to get at the bulb. After quite a lot of effort and grumbling I gave up and tried google - and came across this forum. I took the advice of posters here and went in through the top. Disconnected the battery, lifted it out, I clipped the bulb connector, and then the bulb just twists out. There is no need to touch any of the screws on the bulb unit. Slotted the new bulb in, clipped the connector back on and replaced the battery. It was all done in about 15 minutes. Really I am left wondering why the manual suggests getting at the bulb via the wheel as accessing through the bonnet worked a treat! Thanks to everyone who posted on this topic.
I need an answer to this post!!!! I have a 2003 Honda accord. I've read the threads. I am having a really hard time removing the wiring harness. I'm pretty sure I am pressing on the clip and pulling down. The plug/wiring harness does not move at all. What am I missing? Please help. Thanks!
I have read the posts and I have a 2005 Accord EX and found going through the wheel well was so much easier than through the interferences in the engine compartment. I turned the steering wheel in the direction that I was positioned to provide additional room and then I popped out 2 plastic inserts that hold the wheel well liner in place at about 11 and 12 o' clock and rolled back the plastic liner and had immediate access to the low beam bulbs. No loosening of screws on the lamp required and no removing the battery and air intake (drivers side). The tab on the wiring harness needs to be pushed from the bottom and wiggle the socket back and forth and it popped right off. It took less than 5 minutes to replace both bulbs.
Thanks to all who identified the no-screw method. Changed Passenger side on 2003 Accord in about 2 minutes, Longest part of the process was getting the new bulb out of the retail packaging.
Just did the driver's side low beam on my 2003 Accord. Turned the wheel all the way to the right, popped out the first two wheel well liner inserts, and pulled out the liner just enough. Pressed the base of the wire harness plug and pulled it down and off. Twisted the bulb counter-clockwise to extract it. Put the new one in by doing the reverse, and popped the harness plug back on. Scratched up my forearm a little, and did a lot of the operation by feel, since I couldn't see anything with my arm in the way, but it was basically a breeze.
Call me lazy but I called my Accord dealer for a quote and they replaced both bulbs... Cost $26.40 for the 2 bulbs and $10 for labor. I had it done during an oil change. Pretty much the same amount of time it would have taken me to go to an auto store to buy the bulbs. The bulbs are pretty bright too!
In my 2007 Accord I DID NOT remove ANY fender liners on wheel wells, under the hood, or on the front bumper, etc. Just the battery. Then reach in with a long screwdriver, or something to lightly pry the bulb socket/clip down and off , while you are pushing in on the little flange/lock on the side of the white socket, that faces to the rear and it'll come off easily, gradually working it off. Then turn the light bulb flange (Black) counterclockwise, as it comes off very easily. No need to loosen those three screws, or ANYTHING. It's a little tight,but what isn't in the engine compartment these days? Took probably 5-10 min, once I read some of these pointers and took the time to remove the bulb socket with the screwdriver.
I am not a car guy and this task took under 5 minutes. Replaced passenger side low beam in 2005 V6 Accord sedan. Press and hold tab at bottom center of white clip and pull off the bottom of the bulb (basically pulling the connection from the bulb). Rotate the base of the bulb counter clockwise a small amount (1/8 of a turn even sounds like a bit much). Pulled bulb out. Replace new in reverse order. NO screwdriver needed. No need whatsoever to do what others have said about loosening screws, etc.
Just replaced the driver's side low-beam headlight on an '04 Honda Accord. MAJOR PAIN IN THE ASS, HONDA.
Thanks for everyone posting their experiences, I did not feel like "an idiot changing the bulb the stupid way". The passenger side was easy, and the high beam light is a good way to reference what the socket looks like and how to remove the wiring plug. On the driver's side I can feel the parts without removing the battery. But I decided to go in through the wheel well anyway. Pretty easy, but unlike the passenger side, I could not rotate the bulb at all after removing the wiring harness. Even both arms through the wheel well couldn't get enough torque, the dang socket was so tight. Even cursing Honda while turning did not help. I only had a 6" screwdriver but got it in through the wheel well with my right hand and guided it into the top screw with my left hand from the top. Turned the screw a tiny bit and then the light socket came out easily. Then I called my son to get the new bulb because I didn't want to move the screwdriver! Everything else was easy. I think whether or not you have to remove the battery depends on how big your forearms are and if you got a bigger battery than stock. Good luck all. There's no shame in going to the dealer. 2007 Accord 4 cyl.
This was so easy. You don't need to remove any screws or go in through the wheel well. Go in from the engine compartment and stick your hand in there. Just disconnect the wire harness, by pressing the tab and pulling down. Then unscrew the bulb just like any screw. It might be tight so I had to give it a tug with pliers but that was it. I did remove the battery on the drivers side to get my hand in there.
You have obviously came here as did I, to seek the best advice on changing the headlamps in a 2005 Honda Accord EX. I had done this before on an older Civic but it didn't have separate high & low beams. I replaced both low beams in about 25 minutes (my driver's side went out). Like most here state, do the passenger side low beam first to get a feel for it. It is easy to see and get to. Grab the connector down low, squeeze and pull straight down. It should come off easy, but you may have to wiggle it back & forth a little. Once the connector is off, grab the bulb housing and turn it a quarter turn towards the fender well. You should then be able to pull the bulb & housing straight out. You may have to turn & pull a bit at a time to feel that is has come free from the housing. Then take the new bulb & housing and put in the same way you took the old out. Have it tilted a quarter way toward the fender well, feel it nestle into the housing, and turn it back towards the engine to where the connection part is straight down. Then push the connector housing back on, and you'll know it's secure when you hear it click in place. This took a whopping 5 minutes...! There is some discrepancy in this forum as far as changing the driver's side, but I say as do many, to go ahead and remove the battery. Plan ahead & save your radio code to re-enter once you are done. It took me about 10-15 minutes to remove the battery brace and disconnect both posts from the battery. Once you lift the battery out, you have a pretty clean shot at the bulb. Just do the same as you did on the passenger side, & disconnect the wiring & turn the bulb housing a quarter turn towards the fender well. Pull out and replace the same way. Then put the battery back and you are done. This is also a good time and excuse to clean your battery terminals if needed. Before you tighten down the battery terminals and put the brace back on, test the lights to be sure they are both connected and working! I like many recommend placing both bulbs when one goes out. It is just a matter of time before the other one goes. I don't remember seeing it mentioned, but I saved the old one that was still good as a spare, just in case of an emergency. As noted in other reviews, do not touch the bulb glass with you bare hands. I also saw no reason whatsoever to loosen any screws in the housings that hold the bulbs. One other tip I have is to do this outside to get as much natural light as possible to see. It was snowing when I did mine, but I backed the car into the garage and worked on it with the garage door up. I hope this helps & good luck! There was no way I was going to go through the wheel well to replace! That's just crazy...!!!
OK I just did this for the first time on the driver's side low beam headlamp on my Honda Accord EX. It's a little bit painful but requires only a flat blade screwdriver. You do NOT need to remove the battery. Disconnecting it will require resetting the radio by reprogramming in the code usually a 4-digit number located on a small label inside the glove compartment and resetting all of your preset stations. See this video with one exception:http://www.carcarekiosk.com/video/2005_Honda_Accord_EX_3.0L_V6_Sedan_(4_Door)/lights/headlight. Here's the exception: When you get to step 4, you will NOT be able to twist the bulb until you first disconnect the socket from the bulb. Do this by pushing down the tab on the socket. You push down the end of the tab closest to the wire (farthest from the bulb). This takes some doing due to the close quarters and must be done by touch alone since while your hand is in there you have no visual. You can practice on the passenger side bulb since you can see it fro inside the engine well. You might even want to replace it too since it will likely burn out soon too. (For me this one burned out first, I replaced it then the driver's side burned out about a week later.) Once you do this you pull down the socket and disconnect it from the bulb, That's the hardest part of the whole operation. The socket PREVENTS the bulb from being turned and removed so it must be disconnected first. This is designed so the bulb is held in place and not allowed to turn from any vibrations due to driving. Now you just need to twist the bulb less then a 1/4 turn while pressing it slightly against the headlight housing. No need to be loosening screws or any such thing. Remove the old bulb. Now insert the new bulb into the housing turned at about the same turn angle as the one that allowed you to remove the old one. Play with it a bit until you feel it slip in. Turn it clockwise while applying slight pressure against the headlight housing until you feel it seat and lock. Then reconnect the socket by pushing onto the bulb plug and you'll feel it click lock into place. Before reassembling the wheel well lining to turn on the headlights to be sure you have a working headlight again. If you haven't noticed the low beams are the outer headlights, the high beams the inner ones. Reassemble the wheel well lining. The lower part must be tucked inside of the fender (quarter panel) the upper part goes outside of the fender and gets reconnected using the 2 rivets you removed earlier. This took me about 20-25 minutes. Would have taken less time but I had to discovered the trick about disconnecting the socket from the bulb before turning. Good luck.
55galfromtheOC I just now replaced my 2006 Honda Accord low beam headlight bulb ... bulb #9006 (high beam bulb is #9005) ... popped the hood, unplugged the bulb, twisted, and it came out easily ... inserted new bulb, attached plug ... done! Took less than 5 minutes. I purchased a 2- pack of bulbs for approx. $25.00
I have a 2008 Honda Accord EX. I've noticed some misleading info on here when I first read some comments and then read the owners manual, which doesn't tell much. First of all the low beam highlight are on the outside and as the manufacture and others do recommend starting your car and turning the steering wheel as far to the left as possible and then turning the engine off. That give you better access to the area you need then removing the two on plugs on the splash guard first and then one more toward the inside. It's not hard to see what needs to be removed. After that you can pull the splash guard out of the way in order to get to the bulb to be replaced (9005). Then on your high beams, starting with the passenger side under the hood you can see the overflow tank for the radiator. That needs to be pulled upwards out of the bracket and the lid unscrewed so you can sit it out of the way. Now this gives you access to the high beam bulb (9006). you can see the plug because it is a medium blue in color even though you still do not have a great deal of access unless you have small hands. I didn't have a lot of trouble with replacing this bulb but when I looked on the driverside, I needed to remove the battery and the holder and a black electrical block next to the battery in order to get access to the bulb. Actually you can't remove the black box, you can remove two bolts that hold it in place and then bend it out of the way. That makes it easier to access but as before you still do not have a lot of room to work with. Hope this helps someone.
I have replace all headlight bulbs in my wife's 2000 accord. Not once have I ever needed to use a screwdriver or go in through the wheel well. Simply raise the hood and twist the bulb harness about 1/8th and they come right out. One person posted it is a little easier to unhook the harness and then just twist the bulb base itself which is true. I am a 55 yo totally disabled veteran with arthritis in my hands and didn't find it too difficult. Good luck to all. I have a unique problem though. My passenger headlights work perfect, dim and bright. However, the drivers side on dim is really dim and the brights won't work at all. Any ideas?
Elteec, this may sound counter- intuitive, but it is likely your driver's side bulb socket has a bad ground connection. Perhaps inspect the inside of the socket, try pulling lightly on the harness wires to see if they can be pulled out, and checking the ground connection to the chassis. Another way to check this hypothesis is to remove the passenger side bulb from its socket. Then your driver's side dim will become dimmer or not light up at all. Good luck! Andrew
For all those people who claim you don't need to loosen the screws, that's good for you if you didn't need to. But for many people, it may be necessary to loosen those screws. Factory tightened screws may be too tight to turn that bulb. I was able to get by loosening the most accessible screw on the passenger side low beam by a 1/4 turn. But it was completely impossible to turn that bulb without doing it.
On the passenger side, I did need to slightly loosen one screw, closest to engine compartment, to get the bulb to rotate for removal. Driver's side (using battery removal technique), did not.
Follow instructions posted by user pgens here. I followed it exactly and got my 2003 Accord low beam bulbs replaced - both driver side and passenger in less than 15 minutes. Driver side - you do need to remove the battery to get access to the bulb.
Replacing a 1994 Honda Accord headlight bulb is easy, especially the low beams. First remove the wiring plug from the 90-degree bulb base. You'll see a bezel ring around the bulb. Mine was gray with three finger grips on the edge. Rotate the ring counterclockwise 1/4 turn. Then gently work the bulb out of the three slots in the bezel ring. Put in the new bulb using a clean soft cloth. If you touch the bulb, it will cause the bulb to burn out again quickly. The air vent on the passenger side is just pushed into its base and can be lifted out, but it might take a little muscle and wiggling to get it off. I learned these things as I replaced mine in under fifteen minutes without using any tools.
Just did the passenger side low beams on my girlfriends 2005 accord. Push in the little tab and pull the wire harness off. It can be tricky but it comes off with a little jiggle. Turn the bulb counter clockwise. It should come out without having to remove the screws. Don't be afraid to use a bit of force to get it to turn. Put the new bulb in and turn clockwise till its set in place. Reconnect the wire harness and walk away.
Driver's side low beam bulb replacement simple as pie on 2005 Honda Accord sedan. 1. Bought Sylvania Basic 9006 bulb at Walmart $8.97 plus tax Feb. 17, 2017. 2. Took out battery. 5 minutes or less. Needed 10 mm socket wrench. 3. Took off some kind of simple air deflector plastic piece next to the battery. Had to remove two press fit plastic attachment pieces and air deflector could be pulled right up. 1 or 2 minutes. 4. No need to loosen any screws. 5. I pressed white lever on bulb socket, but could not remove it because of interference with the screwed on plate. 6. With bulb socket still connected to the light bulb, rotate the socket/bulb assembly counterclockwise about 1/8 revolution or so. 7. The socket/bulb is now free. Gently pull it out. 8. Press white lever to remove bulb. 9. Put old bulb back in the socket, and practice putting socket/bulb assembly back in to the light housing. Reversing disassembly procedure means you'll need to turn about 1/8 revolution clockwise when connector/bulb assembly is flush with the light housing. You'll experience the feel of a satisfying click when you rotate it into place. 10. Now, put the new bulb in the socket, and apply your practice session to the real thing. I used latex exam gloves to avoid getting skin oil on the new bulb. 11. Replace your air deflector and battery. You'll have to reset radio and/or Nav. If you know not to try to take off connector when bulb is still in the light housing, the whole process takes about 10 minutes.
I just did this. It is NOT necessary to remove the battery. Just take off the negative cable from the post and undo the two nuts on the battery holder. Scoot the battery towards the engine a few inches and there is plenty of room to get your hand to the bulb. Hardest part was figuring out what position to get the bulb back in. start at about four or five oclock, then turn to six oclock.
I just replaced all 4 headlight bulbs on my 2007 Honda Odyssey. After much blood,sweat, and tears, I finally had enough.and made a special tool for removing and installing the 9005 and 9006 Sylvania Siverstar Ultra bulbs. It is basically a three-sided long socket that grips the bulb and allows you to twist the bulb in or out of the socket hole. There is just not enough room to get your hand in the small space around the bulb and twist it with your hand. If anyone is interested, I'll make you one for $20 shipped. Email me at bulverdeman@gmail.com Thanks, Sam Roberts
